Hooking Up Rear Work Light
 | maugus63
Join Date: May 2004 Posts: 18 Fultonville, NY 
|
2005-01-30 105259
I need some advise on hooking up a rear work light on my 4500. I put a toggle switch where I want it and mounted the light bracket on the on ROPS.
Where I need help is where should I run the power from? I am "electrically challenged" and dont want to take a chance on "frying" anything.
Any advice will be appreciated!
MIKE
Reply to |
Hooking Up Rear Work Light
 | Art White
Join Date: Jan 2000 Posts: 6898 Waterville New York 
|
2005-01-30 105268
The lighting systm could probably handle an extra light. ....
Reply to |
Hooking Up Rear Work Light
 | Iowafun
Join Date: Jul 2004 Posts: 955 Central Iowa 
|
2005-02-01 105362
My 4310 had a connector in the wire harness for a rear mounted work light. I used a fish tape to run the wire up through the ROPS to the light. The harness connector was located down in the wire harness near the 3 point at the rear of the machine.
You can use a voltmeter connected to the power and one end to the chassis to check if the light switch would run it. ....
Reply to |
Hooking Up Rear Work Light
 | greg_g
Join Date: Jan 2004 Posts: 1816 Western Kentucky 
|
2005-02-01 105366
Worst you'd most likely do is blow a fuse. A standard 55W halogen work lamp, will add about 4.6 amps draw to whatever circuit you tap into. With a lot of luck, you might pick a circuit that's got "reserve" amps. If not, the fuse will simply blow. All you've got to do is replace it with one that is 5 amps larger than the one removed.
//greg// ....
Reply to |
Hooking Up Rear Work Light
| metastable
Join Date: Apr 2004 Posts: 78 North Plains, OR
|
2005-02-01 105370
"All you've got to do is replace it with one that is 5 amps larger than the one removed."
Careful here. Some wires are fused near their current carrying capacity. If you attempt to run too much current through the wire, you'll melt the insulation off and ruin your wire harness.
....
Reply to |
Hooking Up Rear Work Light
| greg_g
Join Date: Jan 2004 Posts: 1816 Western Kentucky
|
2005-02-01 105371
Well, let's make it simple then. On JD 45xx tractors, fuse panel position F6 is already designated for a 20A "work light". Install from there.
//greg// ....
Reply to |
Hooking Up Rear Work Light
 | bmeyer
Join Date: Jul 2004 Posts: 175 Central Wisconsin
|
2005-02-02 105395
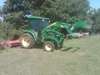
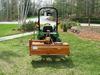
While I don't have a "big" JD, my 2210 also had a open connector bundled just above the rear PTO. Is is connected to the dash light switch. You can easily run power from there up the ROPS and use the existing dash light switch for control. It would be easy to install a separate switch as well but I found no need to do that. I used two lights (see pictures) and they are just right for use during winter nights. No need to even re-fuse the panel. ....
Reply to |
Hooking Up Rear Work Light
| maugus63
Join Date: May 2004 Posts: 18 Fultonville, NY
|
2005-02-02 105398
Thanks to everyone for yor input. I will be taking a look at it again this weekend. Im hoping mine has the extra place to "plug in" at the rear of the tractor.
Thanks again!!
MIKE ....
Reply to |
Hooking Up Rear Work Light
 | AnnBrush
Join Date: Mar 2004 Posts: 463 Troy OH
|
2005-02-02 105406
The JD 4000 series was also released in Europe where they have cab options for these tractors (crummy European weather) as well as more rigorus lighting requirements. The European models are fitted with a 55 amp alternator while in the US the alternator is usually 40 amps. The wiring harnesses are however the same. As a result the actual wires should EASILY carry the additional load. I hooked up two 100W lights to my ROPS (JD4300)and fed them from the trailer hookup at the rear of the tractor - no problem. ....
Reply to |
Hooking Up Rear Work Light
| denwood
Join Date: Jul 2004 Posts: 542 Quarryville PA 
|
2005-02-02 105422
I still have the installation instructions for my rear light and it lists models 4200-4700 and 4210-4710. The wires you are looking for are purple (hot) and black (ground). You can find them on either side of machine and at one piont the purple ends and is taped over. There may be an end on the black too, I can't remember. The purple is specifically for the rear light and is in the wire loom bundle behind and under the seat and by the 3 point rockshaft attachment area. It will operate when the switch is turned all the way on with the head lights and marker lights, not with the flashers. ....
Reply to |

Share This